Showing posts with label project fail. Show all posts

Wednesday, August 22, 2012

tin bama

I mentioned working on some new projects, and here it one of them! 

A tin Bama! 


I totally take back saying the tin is easy to cut... this was not easy. My little paws hurt while maneuvering the metal shears. But the juice was worth the squeeze, my friends! HA! The tin is magnetic, so this baby will make a perfect place for peeps to hang their notes. 

Of course I had to slap a magnet on there for you to see.


And naturally I placed it over my favorite city..


(Auburn, duh!)

I think I'm going to stab some holes in the top to thread some rope through to hang it. 

Of course I can't get through a photo shoot without one of these..


I'll be back with pictures as soon as I add the rope..


Would you like to see the side porch pavers?!?! I told you we stacked them up on the side of the house, and they're still there waiting on me to get to work.


Nothing fancy. They remind me of subway tile. I initially thought about laying them in a running bond pattern...


but now I'm considering herringbone, because it looks awesome. Ok fine, it also has my name in it (equally as awesome).  

This picture below is actually pressed concrete (pretty cool), but the shapes are similar in size to my pavers. 


What do you think?! My concern is having to cut the edges that would lay against the fence and porch. Although I guess I wouldn't have to lay them at a 45 degree angle, and just line them up with the existing porch.. decisions, decisions. 

Here's what's happening at the gate right now. Remember I told you I took the fence apart? I had to rig it up so that the pups couldn't escape. 


I unscrewed all the nuts and bolts, and pulled this sucker out of the ground when my mom was here so we could get the riding lawnmower into the backyard. 


Good lord, I am such a dude. 

I tried to stick it back into the hole the next day, and of course, it wouldn't go back in the final two inches or so that it needed to for the fasteners to fit. So what did I do? I tried to dig around the tiny 2 inch wide hole, and it knocked about 4 more inches of dirt down in there. GREAT! 


What an awful picture of the hole! haha! I don't know why I didn't move the twigs out of the way, but you can see it's about 3 inches at the mouth, and once it goes further down, it's about 2 inches wide. I'm going to have to get an auger from Home Depot. I checked their website, and they make a small planting auger that should do the trick (as opposed to renting a ginormous earth/fence auger). An auger is a metal spiraled post, and you use it to drill into the ground to remove dirt. Kind of like a big ol' drill bit. The smaller ones will fit in my drill, sooooo bonus! 

Cross your fingers that it works so I can cheaply fix my redneck fence. 

Monday, March 5, 2012

a tisket, a tasket..

A wrong color metal basket! 

I got these lovely baskets at HomeGoods. For all those Dothanites out there who haven't been to one (and possibly others, I just know we don't have one down in dtown), it's basically T.J. Maxx that only has home stuff. Aka my heaven. It's actually owned by the same people who own ol' TJ. 

I bought two of these babies to hold towels in my bathroom, but the finishes in there are chrome, and as you can see, these are ORB (oil rubbed bronzed). 


Now, half of this post is a project fail. I found a blog post from someone else a while ago that said you could use oven cleaner to remove metal finishes to reveal chrome. Perhaps I should've found that post and reread it.. 

This isn't the original tutorial I saw, but it's close. Tip Junkie posted this from the Canadian bloggie, Style North. Perhaps my mistake was that it only removes brass (I'm not sure if that's true or not).


Perhaps it was that fact that I used the wrong oven cleaner.. I used the el cheapo brand.


Maybe I didn't leave it on there long enough? 


I let it sit for probably 15 minutes until it dissolved. I scrubbed it a bit, and nothing happened. 

PROJECT FAIL.


Not to worry friends, I bought metallic silver spray paint to use for backup (I just had a feeling about that off brand oven cleaner). I had only sprayed one basket at a time, so while the other one was drying, I got to painting.


You know the drill: I just did a couple of light even coats. Then I flipped it over and did the underside. 

Here she is! 


Not too shabby, eh? I wish it was actual chrome, but I had been looking for towel baskets for months, and dang it I was tired of waiting!


Here they are in their new home. I only put towels on one side so far because quite honestly,  I need to do laundry. And half of my towels don't match. 


I'm thinking about investing in some navy towels. They'd look lovely, I do believe! Then perhaps I'll get a navy mat as well. Thoughts?

In other bathroom design news, you can see I still haven't purchased any pulls (still using the $1 knobs). I'm seriously considering puttying the holes and keeping these. My issue with the pulls is that the existing holes are 4 inches wide, and most pulls in stores are 3" or 3 and 5/8" (or something ridic like that). I don't want to have to drill new holes to center new pulls on the doors if I go with smaller ones. Does anyone have any input?! 


This was the only project I completed this weekend. WHY you ask? Because the weather LOVES to play this little trick on me, where it will be beautiful, sunny, and 75 degrees for four days while I'm stuck in a room with no windows at work, then on the weekends, drop down to overcast and 45 degrees with tornado warnings. There was a tiny window this Sunday where it was a little above 60 degrees (it's not recommended to spray paint when the temp is below 60), so I slapped on my paint clothes and took this project out to the ol' spray paint patch. I'm hoping this next weekend will be more project-friendly. You know what IS going to be friendly about this upcoming weekend? DAYLIGHT SAVINGS!!! 

HELLS YEAH!!!! MORE DAYLIGHT FOR PROJECTS AFTER WORK! 

I can't wait!! 

Tuesday, January 3, 2012

project fail: drop cloth curtains

Hello all!

I'm back with a big ol' project fail. I really wanted to get this post out before the year was over, but oh well! The project technically was successful, it just didn't look good in the space it was intended for. I still wanted to show it in case someone was considering something similar!

I wanted new curtains in my den, and I really wanted them to be green to tie in the green wall color from the dining room. Since I was having no luck finding any off the shelf, I decided to make some of my own! First off, I bought a drop cloth at Home Depot.


I found a paint color that was super close to the walls in the dining room. Score!


I knew I wanted a pattern, and I decided stripes would be easy. Therefore I would need another color since I didn't want to have the drop cloth color showing. I bought both the Brushed Metallic Satin Champagne paint and Gloss Celery paint. I decided the Champagne paint would be the way to go.


I placed the drop cloth flat on the driveway. I'm sure most people iron the cloth first. From the picture below, you can see I did this during the bar stool project and first frames for the tiny art wall, so I did not take the time to iron.


It worked out OK though. I used the folds in the fabric as my stripe lines. I started with the champagne spray paint. I intentionally left a longer side on the bottom side so it could be folded over to make a slot for the curtain rod.


Then I taped off both sides of the stripes.


I also taped down newspaper to prevent the paint from going onto the champagne stripe.


And I finished up on the other side. It was quite a blustery day, which is why I did one side and then the other. The wind thought it was funny to blow the drop cloth over 37 times along with carrying the newspaper pages across the yard.


Almost finished with all three at this point!


The paint was solid enough for my liking. I started to run out towards the end, but the bottom part would be covered by the couch, so it was fine with me.


At this point, I walked the cloth inside to see the coloring. The champagne was way too dark. I decided to go over it with celery paint, hoping it would lighten up.


There wasn't a huge difference. Oh well. Let's see what it looked like inside!


Pardon the mess. I couldn't visualize if it would look alright hung up or not, so I figure I'd go for it. I folded the curtain in half and cut it. I decided I would sew it later with the sewing machine I was hoping to get for Christmas.


Then I really rigged it up: duct tape. I just folded over the top part and taped it. Classy, eh? Again, I would sew it with the soon to arrive sewing machine.


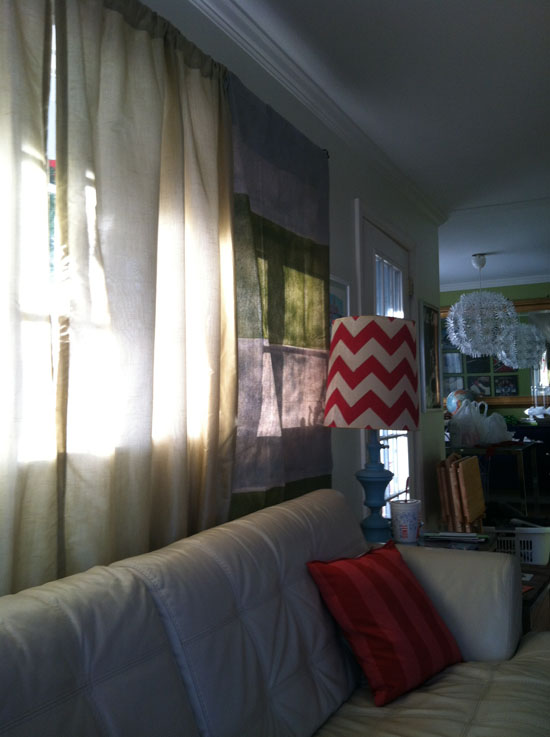
Not too shabby, thus far. It definitely needed some touch ups, but I didn't want to continue if it was going to look bad...


Eek! The spray paint is obvious! I decided to wait until the sun went down before I made my final decision.


And my decision: project fail.

The grayish stripe was suppose to be more gold colored. It may have worked had I not painted the champagne spray paint on there. Then the cream color of the drop cloth might've matched the couches.

My intention was to get a double curtain rod, and have white curtains underneath with the striped drop cloth on top (hence why I didn't make them very wide). Those light green curtains would have been removed had this project worked. Also, the drop cloth will fold up (create pleats) but the duct tape prevented it here.


I found a lot while googling "painted drop cloth curtains". This one was very similar to what I was going for! These curtains definitely had a more finished look than my hurried project.


Check out the blog entry it's from here!

In better curtain news, I finally found some that I love! They have a great pattern on them, they're green, and they were on sale!! Of course they weren't in stock, so they should be in sometime next week. Here they are:


They're from Z Gallerie! They were a bit more than I wanted to spend (even on sale), but I think they're going to look awesome! The color looked almost identical to the dining room when I was looking at them in the store.. fingers crossed they match when I bring them home!