Sunday, January 8, 2012

dining room: then and now

I have finally started projects, room shots, etc. using my new camera! The projects that were posted last week had already been photographed with my phone, so now it's time to bring on the awesomeness produced by the Nikon D3100! 

I told y'all a few weeks ago I was going to show you how the rooms have progressed from when I moved in to where it is today. I'm going to start with the dining room! It opens up into the kitchen and the den, so you'll see shots of those as well. 

Here it is the day I closed on the house. I drove straight there after work and took tons of pictures. Sadly we weren't moved in yet, so there was no furniture. 


Here it is today! So bright and cheery! I love it! I liked the paint color in there so much, I didn't have to change it. 


This is from the night we moved in the house. Boxes and clutter everywhere, but this is one of the only pictures I have with the old dining room table. It was too big for this space (and not really my style), so I gave it away to Goodwill. 


Here is the new dining room table! It's the Torsby table from Ikea (I don't think they make the frosted glass top anymore. Only clear glass now). I ordered the ghost chairs from hautelook.com for quite a deal. The rug is from Southeastern Salvage with a paint job from myself. I'm still looking for dining chairs, I just haven't found exactly what I want yet..


View of the dining room from the kitchen. This was before the big remodel. 


After! The whole wall was torn out, the desk top brought up, and a bar top added.


Before: view into the kitchen from the dining room. 


After! I'm so glad the bar top was added so I could bring in the colorful barstools! 


 Full shot once more! 


Some detail shots, shall we? Here's the lovely Maskros light from Ikea with my globe, fish, string art, and doggie treats in the back.


Here are the records! I love these things. They were my dad's back in the day, so I snagged them and found some album frames at Michael's. Well, all except Thriller. My mom got me that a couple years ago. Ha! I had them hanging in the dining room of my house in college. They use to hang where the big mirror is on the opposite wall in this house, but when we opened up the walls in the kitchen, there was some shuffling around of the hanging items. 


Ohhh, ahhhh! 


The barstools! 


Again with the painted rug! I'm happy to report it's held up very nicely. The pathway to the kitchen goes over the right side of it, and it cleans up just by running the vacuum over it.


I got a little camera happy..


Ok, a lot camera happy. This is the path I was talking about. It's a bit discolored, but it's not noticeable unless you stick your face down there.


View into the den from the dining room.


And artsy shot in the mirror. I am obsessed with this camera, y'all. 


I can't wait to show the projects I worked on this weekend! 

Thursday, January 5, 2012

gone to print!

Remember when I won the contest to design the Jacksonville Fashion Week poster??

It's gone to print, y'all! 


I ended up having to change the background due to the low resolution of the original image. This is actually a bridesmaid's dress I have for an upcoming wedding (shout out to Jackie! woop woop!). I snapped a few pics and placed the best one as the background.

I also did a half page ad along with a bridal ad for upcoming issues of Jacksonville Magazine.

SO EXCITING! 

Tuesday, January 3, 2012

project fail: drop cloth curtains

Hello all!

I'm back with a big ol' project fail. I really wanted to get this post out before the year was over, but oh well! The project technically was successful, it just didn't look good in the space it was intended for. I still wanted to show it in case someone was considering something similar!

I wanted new curtains in my den, and I really wanted them to be green to tie in the green wall color from the dining room. Since I was having no luck finding any off the shelf, I decided to make some of my own! First off, I bought a drop cloth at Home Depot.


I found a paint color that was super close to the walls in the dining room. Score!


I knew I wanted a pattern, and I decided stripes would be easy. Therefore I would need another color since I didn't want to have the drop cloth color showing. I bought both the Brushed Metallic Satin Champagne paint and Gloss Celery paint. I decided the Champagne paint would be the way to go.


I placed the drop cloth flat on the driveway. I'm sure most people iron the cloth first. From the picture below, you can see I did this during the bar stool project and first frames for the tiny art wall, so I did not take the time to iron.


It worked out OK though. I used the folds in the fabric as my stripe lines. I started with the champagne spray paint. I intentionally left a longer side on the bottom side so it could be folded over to make a slot for the curtain rod.


Then I taped off both sides of the stripes.


I also taped down newspaper to prevent the paint from going onto the champagne stripe.


And I finished up on the other side. It was quite a blustery day, which is why I did one side and then the other. The wind thought it was funny to blow the drop cloth over 37 times along with carrying the newspaper pages across the yard.


Almost finished with all three at this point!


The paint was solid enough for my liking. I started to run out towards the end, but the bottom part would be covered by the couch, so it was fine with me.


At this point, I walked the cloth inside to see the coloring. The champagne was way too dark. I decided to go over it with celery paint, hoping it would lighten up.


There wasn't a huge difference. Oh well. Let's see what it looked like inside!


Pardon the mess. I couldn't visualize if it would look alright hung up or not, so I figure I'd go for it. I folded the curtain in half and cut it. I decided I would sew it later with the sewing machine I was hoping to get for Christmas.


Then I really rigged it up: duct tape. I just folded over the top part and taped it. Classy, eh? Again, I would sew it with the soon to arrive sewing machine.


Not too shabby, thus far. It definitely needed some touch ups, but I didn't want to continue if it was going to look bad...


Eek! The spray paint is obvious! I decided to wait until the sun went down before I made my final decision.


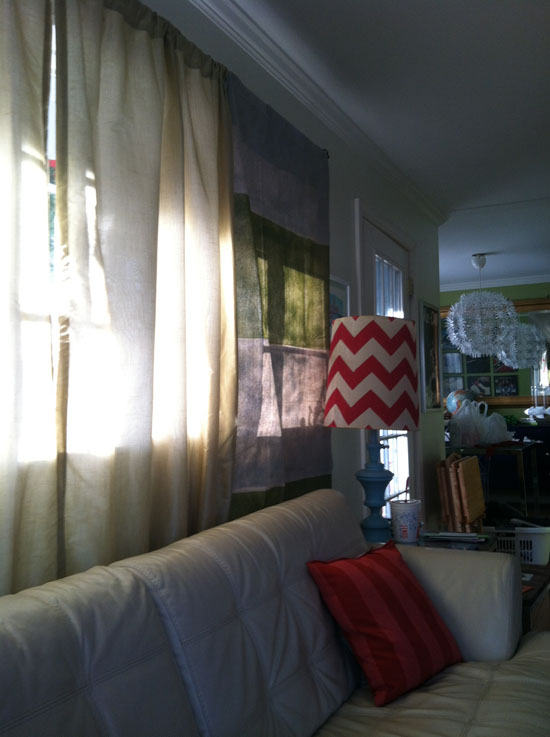
And my decision: project fail.

The grayish stripe was suppose to be more gold colored. It may have worked had I not painted the champagne spray paint on there. Then the cream color of the drop cloth might've matched the couches.

My intention was to get a double curtain rod, and have white curtains underneath with the striped drop cloth on top (hence why I didn't make them very wide). Those light green curtains would have been removed had this project worked. Also, the drop cloth will fold up (create pleats) but the duct tape prevented it here.


I found a lot while googling "painted drop cloth curtains". This one was very similar to what I was going for! These curtains definitely had a more finished look than my hurried project.


Check out the blog entry it's from here!

In better curtain news, I finally found some that I love! They have a great pattern on them, they're green, and they were on sale!! Of course they weren't in stock, so they should be in sometime next week. Here they are:


They're from Z Gallerie! They were a bit more than I wanted to spend (even on sale), but I think they're going to look awesome! The color looked almost identical to the dining room when I was looking at them in the store.. fingers crossed they match when I bring them home!

hold me closer, tiny art wall! part deux

I hope everyone had a lovely new year! I had tons of fun in Atlanta at the Chick-fil-a Bowl watching my Tigers win! I also got some shopping in and went to IKEA for some goodies! I'll be sure to introduce those soon. For my first bloggie post of the year, I am revisiting my tiny art wall!

If you recall, this is how you last saw it on the first "hold me closer tiny art wall" post


And here it is now! 


I rearranged some frames and (obviously) added some new ones. In a prior post, I told you I had purchased a bunch of frames at Michaels on sale, and these are most of them! I had to spray paint a couple of them, and they're all filled with art now! The BCS Championship ticket and the little Alabama thank you card were up in the first post, so I'll introduce you to the other nuggies! 


This World's Exposition Shows piece is actually a postcard! I got it from my favorite poster shop, Hatch Show Print in Nashville, TN. I bought a few of them a while ago when I purchased all the big posters going up the staircase


I bought this next print off fab.com for $5. Fab.com is one of those discount sites like Hautelook, Gilt, Ideeli, etc. If you like artsy things, you should join the site! It's free!

These are a couple of the Eames rocking chairs. They're mid century modern, so of course I like them! I actually have a white one in my room (replica, of course). Someday I will own a real one! 


A little print of Samford Hall! 
(It's at Auburn University, for those not familiar.)


These two squares are actually pictures I took on my iPhone using Instagram. I just printed them on my printer at home and cut them out. They look a bit fuzzy in this picture, but they aren't like that in real life. The top one is of Sloss Furnace here in Birmingham, and the bottom one is of a train going by at a railroad crossing that seriously stops me almost everyday.

By the way, is anyone here on Instagram? My username is herrira (from my college email.. I should really stop using it because it confuses people). Anyhow, follow me and I'll follow you (or let me know your username)! I only follow a couple of people so far (most are randoms), so I'd love to see pics from people I know! 


This little gem is from New Orleans. It's actually a card. I just put it in the frame folded in half. The gold paper backing is actually the piece of paper that came with the frame. You know, the one that says the dimensions and brand name? I just turned it around to the back white side and spray painted it gold with some leftover spray paint. 


It's actually an original print, and it has a lovely sheen to it (the spray paint is shimmery as well). I decided to not center it in the middle, and I really like it's placement with more of the matting showing at the bottom.


This baby is another postcard from Hatch Show Print! 


And here we have another postcard! This one was ordered from Fab.com as well. It came in a pack of 30 cards for about $15. I love the old school travel poster look.


I think I need something in the top right, and a couple of small doodads to fill in some gaps. I won't be able to go lower with the frames due to doggie tails whipping around! I'd hate for one of the pups to break some glass and hurt their little paws! 


Here's a view looking at the front door. See that naked wall on the right? Tiny art wall will be expanding to the other side as well! I bought tons of frames on my big IKEA trip this past weekend to help the progress! That's the entrance to the kitchen on the middle of that wall, and then the bathroom entrance to the far right of the picture.


Then there's this wall to the right of the bathroom. I swear, there was no thought to the placement of anything in this house! The light is not centered, there's a random switch in the middle of the wall, with another one to the left of it. I don't think tiny art wall will continue this far, but I feel like it needs something..


Anywho, here is the "hold me closer, tiny art wall" one more time! 


Does anyone else have a tiny art wall going up?!