Sunday, January 15, 2012

pup silhouettes!

This could be my best thrift store transformation yet! I found these oval "frames" for about $2 each at my local thrift store. I say "frames" because they're actually all plastic. There's no back to remove or glass on the front. The cherubs are actually stuck on there like stickers.


One had a crack and hole in it, so I had to fix that before the big transformation.


I used the Patch n Paint that I had from patching holes in the wall.


I scraped it on there with the putty tool, but it was easier to manipulate with my fingers. 


Here's the back. It looked like the back of a chalkboard.


As with all projects, I brought them out to the yard to spray paint.


New development in my spray painting technique: I propped the "frames" up on leftover 2x4's so the grass wouldn't come up over the edge. 


I used this Rustoleum champagne metallic paint. It was from Home Depot for about $7. The Krylon metallic paint from WalMart is cheaper, but in this instance, I didn't want to make two trips. Just FYI if you were in the market for metallic spray paint.


You may have noticed this project going down from my full project picture in the revamped bedside table post! 


It took several coats. The cherubs were raised up a bit, so I felt like the more layers I put, the less noticeable they would be.


I finished the second half of the project this weekend! I took profile pictures of my pups on my iphone. You may notice I had to hold their heads in the correct position.. Then I sized them on my computer and printed them out.


Then I cut them out and shaped the bottom.


It was easier to tell the shape on the white side.


I outlined them with a pencil. I decided to do them facing each other. 


I mixed up some paint to make navy and painted them on there! 


I had to do a couple of coats so the brush strokes weren't noticeable.


All finished! 


I took down the Hatch Show Print, and hung up these lovelies! Don't worry, ol' HSP will reappear on the tiny art wall! 


Some room shots, shall we?


Can you tell which pup is which?


Thursday, January 12, 2012

fish + line design updates!

There are several invitations I haven't shown on the ol' bloggie yet, so while I'm waiting on the weekend for more projects to roll around, here are a few of them!

Engagement Party Invites! 
I usually do a couple of invites so people have choices. For this one, the client submitted the colors they wanted to use.


This is the one they ended up choosing! Typography invites are my favorite, so of course I was happy with their decision!


Rehearsal Dinner Invites!
I love the colors on these! The client chose the pink and wine colors, and also submitted pictures of the farm where the wedding was taking place. The actual ceremony was going to be near two oak trees, and she wanted those to be incorporated as well.


This is the one she chose! I actually did this one first, but wanted to do one more just in case she didn't like it.


Birthday Party Invites! 
They are going to the movies, so naturally I had to make a movie themed invite! I made a couple of options as usual.


The first one I did was a ticket. I wasn't digging it as much as I thought I would, so I went in another direction..


and did a marquee! This is the one they chose! It's my favorite as well. I think I like anything with a radial.. and bright colors.


They're going to see Beauty and the Beast! I asked if I could tag along.. 

These are just a sampling of what I've been working on lately! I definitely need to get my website updated so I'll be more on top of things. If you're interested in anything, you can email me at fishandlinedesign@gmail.com or check out my Etsy shop!

*Note: I changed phone numbers and addresses, so you creeps out there won't be able to stalk these fine people.

Wednesday, January 11, 2012

bedside table revamp

Hello again! 

I told you I was going to do the living room before and after, and wouldn't ya know, I didn't take pictures from the correct angles. I didn't even get one of the whole room! So I'm going to take more pictures this weekend and get that post to you next week! Instead, I'm going to show you a project from this past weekend: revamping the bedside table I got from the thrift store!

Here he is still in the thrift store, obviously in need of a little love. 


He looked much better in natural light, eh? Notice anything off with the piece?


The front legs didn't match! I was a bit sad about it.. until I noticed whoever put this beauty together switched the front and back legs! See the matching one on the back right??


Legs fixed! Woo!


Just to prove it.. $15!! 


The top is a scratched. Eek!


Here's my usual picture with all the projects I'm working on in the front yard.. haha.


I read about this stuff on another blog. They didn't use this brand, but it was all I could find at Home Depot. It's wood refurbishing oil, and there's no need to sand and stain! You just rub it on with a cloth, and then rub it off with a dry cloth. HOW EASY! 


I pulled out the drawers and removed the hardware. I cut up an old tshirt to make a cloth, because I thought paper towels would not work well.


Then I just let it dry in the yard for a while.


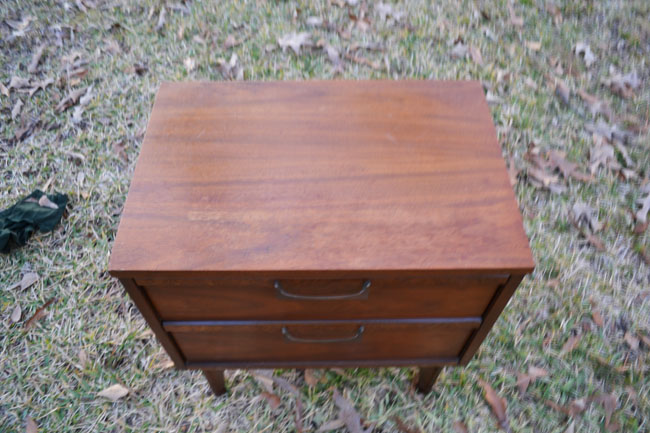
Here it is all put back together! Sorry for the fuzziness, I'm still figuring out the new camera..


See how much better the top looks! 


How beautiful! 


I'm in looooove! Now I've got to find a similar one to go on the other side of my bed. I've got a big bedroom makeover in the works!!


EEEE! 

Tuesday, January 10, 2012

tv stand facelift!

Hello everyone! 

Today I'm going to show you my small TV stand project so that I can do my before and after  living room post tomorrow! Here is how my TV stand bookcase looked for a long time. Unorganized. Randomness. Woof. 


So I got off my behind and styled the shelves. I brought down a bunch of my books from upstairs and collected some of the doo dads from around the house.


It remained like this for a while. Until pinterest got involved..


Have you seen where people paint the backs of their bookshelves a different color? I've always loved the look, but I haven't ever tried it. Well these shelves don't have a back, so what to do? I saw on pinterest where someone had spray painted foam core and cut it out to fit the backing of their bookshelf. GENIUS! Then you don't have the commitment of paint, and you can interchange it whenever you like! I ended up using poster board.. because I'm a cheap skate. Here's the paint color I used:


And viola! Color backed shelves! I just cut the poster board into squares to fit, and taped it on the back with painters tape. What a nice change!


Let's have a look at some of the shelves, shall we?

My mom painted this vase for me on one of her mission trips to Panama! Isn't it lovely?! And that baby dino came with Richard's Christmas gift. He seemed to have left it at my house, so I put him on the shelf. I think I'd like to do a terrarium one day, and put him in there to live!


Meet Napoleon! I found him at Ross for only $10! Who doesn't love a good white ceramic animal?


Here are all of our photo booth photos! Our friend's had the booth at their wedding! How fun! There were tons of props, and the people running the booth would print out 2 copies, one for the couple to go in an album, and another for the people in the pictures! They even put them in these frames for us! How nice! 

That cute little white vase to the right is from the thrift store for $1! Nice! 


The coke bottle is commemorating the Auburn Tigers 1984 Sugar Bowl win! I got that vase from TJ Maxx for about $7, and I filled it with tickets from past events!


I got this penguin pair at the thrift store for about $3 for both! How cute are they? I love hourglasses. This is actually a 30 minute glass.. ha! It's from Kohl's (random) from a year ago.


This little pony is from Arizona. I got him on my trip last year, and he was hand made by the Native Americans from that region. I brought the vase back from Deruta, Italy. And yes, that is a sparkle-dy picture frame (probably from 1997) with a photo of me and 3 of my best friends from 5th grade. Three of us had matching Speedo swimsuits that we all bought separately. We thought it was the greatest thing! We're all still friends, by the way, so I think it's acceptable to have it displayed.

And yes, that is a Spongebob toy from a kid's meal. He made his way onto the shelf awhile ago, and I can't make myself take it down.


I didn't take pictures of all the shelves, but somehow I missed a close up of that top right one. It houses my all time favorite picture! It's of me and my friends before homecoming in 8th grade. The majority of us are still BFFs. Most of us have gone to school together since kindergarden. Can you believe that?! We had our 20 year anniversary of knowing each other last year. Do you know what the 20th anniversary gift is? China. I brought this up to my roomie Katie (who is in the photo as well), and she was suppose to get together a trip to China (since we're not in the market for dishes).. I think we ended up going to get Chinese food instead. Oh well! Point of the story: you can meet your BFFs in kindergarden. There have been 3 weddings we've pretty much all been a part of, and I'm sure there will be more to come! Amazingly, a lot of us (and others from our highschool class) live in Birmingham, so we get to have mini reunions all the time! I love my friend family!

You may have noticed Gilmore Girls on the TV. Sorry I'm not sorry.


I lubs it! Notice our sweet selection of games on the bottom shelves?! We are big fan of spontaneous family game nights. And by family I mean roomies plus whoever drops by..


Get ready for the before and after room pics tomorrow! 

she get it from her daddy!

Please tell me everyone remembers that song from back in the day, "She Get It From Her Mama" (atleast that's what I think it's called). If you don't, then please excuse the title.

Anyhow, my dad is quite the DIYer and decorator. Not in a girly way, mind you, but a hunting cabin, fish camp, antique lovin' kind of way. I'll have to get some pictures of the lakehouse with my new camera next time I go to showcase all the awesomeness.

My dad also owns a metal fabricating shop down in Dothan, AL. If you recall, they made those awesome stainless steel bar tops that now reside in my house. Dad also constructed other things for me in the past, like a rabbit hutch for my childhood pets and a hayride cart. I guess that's what it was called.. it was on a trailer pulled along by a tractor and held about 12 people. It was awesome!

Well recently, dear ol' dad has been constructing these cookers. If you know him, you know he loves to cook! He's had one of these big cookers for as long as I can remember. He's done fundraisers for my sports teams & school, pretty much all of his class reunions, and has even cooked food for people in need during the holidays. How sweet!


He tried several different designs, and this one is the best!


He even makes them on wheels!  


If you know about cooking/cookers, you know how important it is to have the meat cooked evenly, and this one does just that!


Here's dear ol dad! Rocking the mustache and spatula! And black jeans.. such a hipster.


Just last week I helped him place the cookers on craigslist. You can see the listing here: http://dothan.craigslist.org/hsh/2783999664.html (It's pretty funny. I tried to edit it a bit, and dad wouldn't let me). I don't know how many people in my bloggie "audience" would be interested in this sort of thing, but you might know someone who is! It went up on Thursday night, and on Friday morning I had a text from my dad asking why no one had contacted him about the cookers.. hilarious! Feel free to pass this along if you know someone who's in the market for a cooker! 


I'll be back tomorrow with a project from the weekend!


PS: All pics on this post were taken by my ma, Susan Herring! Thanks ma, for letting me borrow your camera to get the pics for craigslist and a bloggie!